Home Chill Space Reset: DIY Comfort + AI Room Planning
Build Your Ultimate Home Chill Space: A Simple Room Reset Using DIY Touches and AI Planning
A chill space isn’t about copying a perfect aesthetic—it’s about creating a room that supports how downtime actually happens: decompressing, reading, stretching, gaming, crafting, or simply doing nothing. The fastest results come from a simple sequence: decide how you want to feel, set up functional zones, preview a couple directions (so you don’t waste money), then finish with a small daily reset that keeps the room calm long-term.
Start with the feeling: define how the room should support downtime
Before moving furniture or shopping, get specific about what “chill” means in your home. This keeps the space personal and prevents the common cycle of buying decor that looks good but doesn’t live well.
Pick three “chill modes” the space must handle
Choose your top three: quiet reading, screen time, naps, yoga/stretching, journaling, crafts, or hanging out with friends. These modes determine what matters most (lamp placement, side tables, floor space, storage, sound control).
Choose three mood adjectives
Try combinations like warm + grounded + cozy, or airy + minimal + soft. If you can’t decide, pick one “anchor” adjective (cozy) and two “helpers” (organized, calm).
List the friction points that ruin relaxation
Typical culprits: glare on a screen, clutter piles that multiply, nowhere to set a drink, cords everywhere, harsh overhead lighting, or seating that looks fine but feels stiff after 10 minutes.
Set one non-negotiable comfort upgrade
Pick one change you’ll do no matter what—like a better throw blanket, improved pillow support, a softer rug underfoot, warmer light bulbs, or a simple scent routine (fresh air, diffuser, or candle).
Measure, map, and zone the space in 20 minutes
A little measuring saves hours of rearranging. Keep it simple: you’re mapping constraints, not drafting blueprints.
Measure the essentials
Write down wall lengths, window width/height, door swing direction, and outlet locations. Outlets matter because they decide where lighting, chargers, and screens can live without cords crossing walkways.
Create 2–3 zones to reduce visual noise
Most chill rooms work best with a lounge zone, a storage zone, and an optional focus/creative zone. Zoning prevents one area from trying to do everything—and looking messy while doing it.
Protect the walk paths
A useful guideline is keeping the main path about 30 inches wide where possible. That “easy flow” feeling is often what separates a calm room from a cramped one.
Anchor the room with one comfort center
Choose a primary spot: a sofa corner, a reading chair with a lamp, or a floor cushion nook. Once that’s placed, everything else supports it (side surface, lighting, throw storage, charging, and glare control).
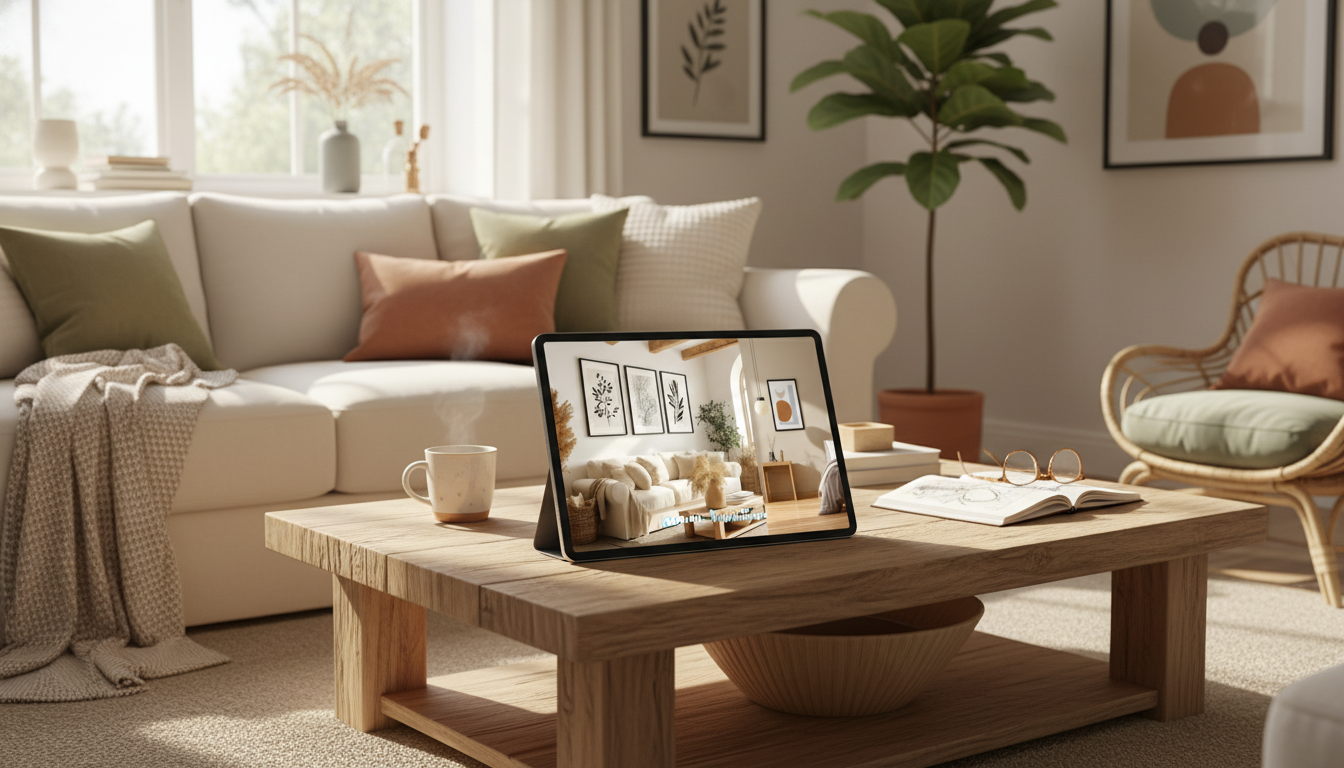
Use AI to preview layout, color, and decor before buying
AI visualizers are most helpful when you treat them like a fast sketch tool—great for trying directions, not a substitute for measuring or checking product dimensions.
Take three clear photos
Test two layout options
Try two color directions
Use AI to catch scale problems early
DIY upgrades that change the vibe fast (without a remodel)
Lighting: switch harsh to warm and layered
Swap to warmer bulbs and add at least two points of low light (like a floor lamp plus a small table lamp). If you use a monitor or TV, consider soft bias lighting behind it to reduce perceived glare. For energy-saving guidance while you upgrade, reference the U.S. Department of Energy’s lighting overview.
Soft surfaces: rug, curtains, and one tactile throw
Sound and calm: reduce echo
Clutter control: turn “doom piles” into containers
Wall reset: one big win beats many small pieces
Make it maintainable: the 10-minute daily reset system
Create a landing zone
Give repeat-use items a visible home
Use the two-basket rule
Choose one weekly micro-task
Rotate one task weekly—vacuum the rug, wipe surfaces, launder throws, or reset a shelf. For a simple routine framework, the American Cleaning Institute has practical cleaning basics that support consistency.
| Upgrade | Typical Cost | Time | Impact on Comfort |
|---|---|---|---|
| Warm lighting (bulbs + one lamp) | Low–Medium | 15–45 min | High |
| Rug sized to seating area | Medium | 10–30 min | High |
| Basket/tray system for clutter | Low | 10–20 min | Medium–High |
| Curtains or fabric panels | Medium | 30–90 min | Medium–High |
| Throw + pillow support refresh | Low–Medium | 5–15 min | Medium |
Pull it all together with a step-by-step plan
Day 1: Clear and capture
Day 2: Lock the layout
Day 3: Add lighting and a side surface
Day 4: Style with restraint
Final check: sit for five minutes
A ready-to-follow resource for planning your chill space
If you want a structured, printable approach to layout choices, mood direction, and AI-assisted visualization, Build Your Ultimate Home Chill Space Guide (digital download) works as a checklist-style companion—especially helpful when you want quick decisions without endless browsing.
To extend the calm into nighttime, pair your room reset with Sleep-Boosting Checklist for a calmer nighttime routine for an easy wind-down flow that matches the vibe of your updated space.
If your chill space doubles as a hangout zone, Social Confidence in Any Situation (printable checklist) can help you feel more relaxed when friends drop in—without overthinking conversation or hosting.
FAQ
Is there a free AI tool to create a house design?
Yes—several AI design tools offer free tiers for quick concept mockups and inspiration. Free versions may limit exports, add watermarks, or restrict high-quality renders, so it’s best to use them for early layout and color exploration while confirming measurements separately.
Is there a free home visualizer AI?
Yes, free visualizers exist that can apply styles to your room photos, though results vary with lighting and camera angle. For better comparisons, use clear wide shots and test two distinct styles rather than repeatedly re-rolling small variations.


Leave a comment
You must be logged in to post a comment.