SkyAlign Computerized Newtonian: Fast Setup Night Guide
Computerized Telescope with SkyAlign and a Compact Newtonian Reflector: Practical Guide for Quick Nights Under the Stars
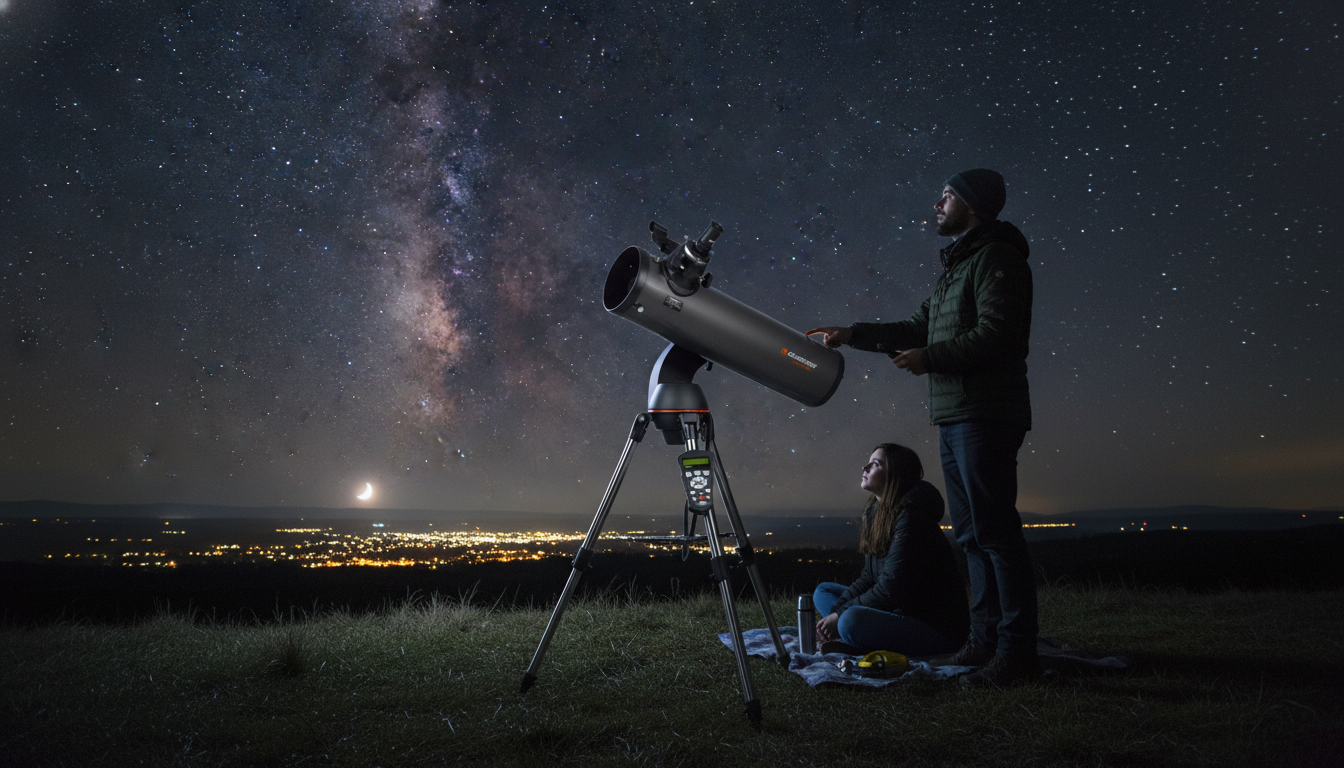
A computerized telescope with SkyAlign and a compact Newtonian reflector layout is built for fast setup, straightforward object location, and satisfying views from backyards, patios, and darker-sky getaways. The combination is especially practical for weeknights: you can spend less time hunting and more time observing—while tracking keeps the view steady once you’re zoomed in on crater rims, cloud bands, or a bright star cluster. For more guidance, see Best Computerized Telescope (Our Top 10 Picks for 2021).
What “computerized” and “SkyAlign” mean in real use
A computerized mount uses a hand controller (or an onboard control system) to point the telescope at objects you select from a database. Instead of manually star-hopping across the sky, you align once, choose a target, and let the telescope “go-to” it—then keep it centered with automatic tracking. For further reading, see Best Telescope 2026 – The Nine Planets.
- Computerized pointing: After alignment, the mount calculates where objects are and slews the telescope to them.
- SkyAlign-style alignment: You typically pick and center a set of bright objects (often stars or bright planets). The mount uses those points to build its sky model.
- Go-to plus tracking: Go-to gets you close quickly; tracking reduces constant nudging and makes higher magnification far more comfortable.
- Accuracy is earned at the start: A steady tripod, a level base, and careful centering usually matter more than rushing through menus.
If you’re new to alignment, it helps to practice once or twice in daylight (without looking at the Sun) to learn the controller flow. For troubleshooting and setup references, Celestron’s support resources are a helpful baseline: Celestron Support: Telescope Basics and Setup Resources.
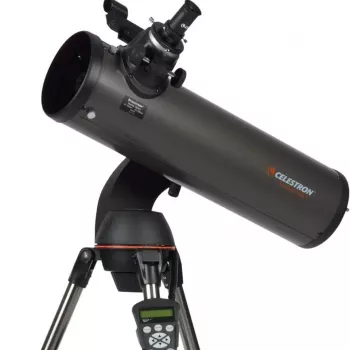
Why a compact Newtonian reflector design is popular
A Newtonian reflector uses mirrors rather than lenses, delivering strong light-gathering performance for the size and avoiding the color fringing that can show up in some lens-based designs. A compact Newtonian shortens the overall tube, making the scope easier to store in closets, carry through doorways, and mount without feeling front-heavy.
Reflectors do require occasional collimation—aligning the mirrors so the optical path is precise. The good news is that collimation becomes quick once you have a repeatable routine, and the payoff can be obvious on planets and close double stars.
Compact Newtonian reflector: quick pros and trade-offs
| What you gain | What to plan for | Practical tip |
|---|---|---|
| More light for the size (mirror-based optics) | May need collimation from time to time | Check collimation before high-magnification planetary nights |
| Shorter tube is easier to carry and store | Open-tube designs can cool and collect dust | Use caps and allow a short cool-down outside |
| Good all-around target range (Moon, planets, brighter deep-sky) | Edge sharpness depends on collimation and eyepiece quality | Start with mid-power eyepieces; go higher once the view is stable |
Setup checklist for a smooth SkyAlign night
A fast session starts with a stable foundation and a few habits that prevent “mystery” go-to errors later.
- Set the tripod on a firm surface: Extend legs evenly and avoid soft ground that can settle while tracking.
- Level for consistency: Perfect leveling isn’t always mandatory, but it improves repeatability and reduces alignment headaches.
- Use reliable power: Fresh batteries or a dependable external source helps avoid slewing glitches and tracking dropouts.
- Choose alignment objects wisely: Pick three bright objects well separated across the sky, not clustered in one region, and not blocked by trees or rooftops.
- Center carefully: Start with a lower-power eyepiece to get the object centered quickly, then refine the centering if your setup allows.
- Confirm time/date/location: Small errors here can ripple into bigger go-to misses later.
For beginner-friendly target ideas and seasonal suggestions, Sky & Telescope’s observing guides are a solid reference: Sky & Telescope: Observing Guides and Beginner Resources.
What to observe first: a practical progression
When time is short, start with targets that deliver high contrast and obvious structure, then branch out as your alignment confidence grows.
- The Moon: It’s the quickest “wow” target. Aim for the terminator line (where night meets day), where shadows carve out crater walls and mountain ridges.
- Bright planets: Jupiter’s bands and moons, Saturn’s rings, and Mars near opposition are rewarding when the atmosphere is steady.
- Brighter deep-sky objects: Open clusters are often the most forgiving; globular clusters and brighter nebulae can be excellent depending on local light pollution.
- Lean on tracking: Once the mount keeps the target centered, you can spend more time studying subtle detail rather than constantly re-aiming.
Getting sharper views: focus, collimation, and conditions
Care, storage, and long-term reliability
A ready-to-go option
- Computerized Telescope with SkyAlign and Compact Newtonian Reflector Design — $623.95 (in stock)
- Less Is Luxe: The Minimal Fashion Guide – Ultimate eBook for Timeless, Effortless Style — $54.99 (in stock)
FAQ
How long does SkyAlign setup usually take?
For a first-time session, plan on about 15–30 minutes as you confirm location/time settings and learn the centering routine. After a few nights of practice, many observers can align in roughly 5–10 minutes, especially with a level tripod, stable power, and careful centering.
Does a compact Newtonian reflector need collimation often?
It depends mostly on how often the telescope is transported and how much it gets bumped. Quick collimation checks are common, and the most noticeable benefits show up during high-power observing of the Moon, planets, and tight double stars.
What can be seen from a light-polluted backyard with a computerized reflector?
The Moon, planets, double stars, and brighter open clusters are reliably rewarding even under city lights. Brighter nebulae and globular clusters are often possible too, and tracking helps you study fine detail longer—while darker skies will always improve the faintest targets.


Leave a comment
You must be logged in to post a comment.